

Introduction
The ASP.NET Core is a free open-source and cross-platform framework from Microsoft for building web application and application backends.
.NET Core has unified MVC and Web API so that we can easily build web applications and backend APIs.
In this tutorial, We'll create a simple Web API in .Net Core to manage the details of Authors and Books. We'll also discuss about two different ways to create the API.
Requirements
- Visual Studio 2017 or newer.
- Postman
Create an ASP.NET core application
To create an ASP .NET Core Web Application, follow these steps.
Open Visual Studio, go to File -> New -> Project, ASP.NET Core Web Application Template and click OK.
Select an API template as shown in the figure below and click the Create button.
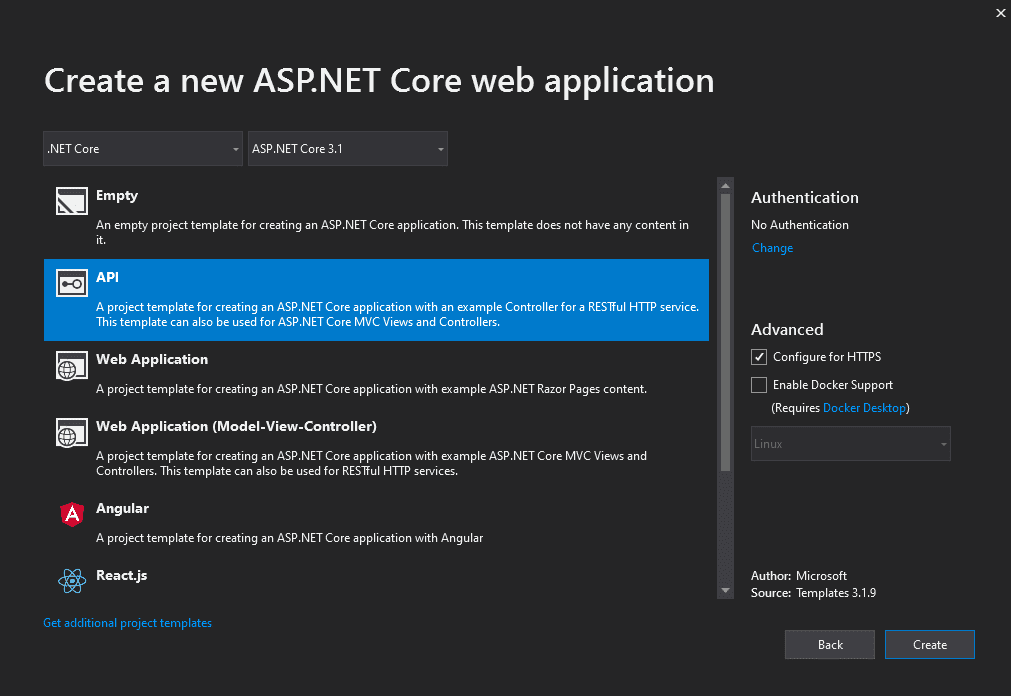
Visual Studio will now create a simple Web API application based on a pre-defined template.
The program.cs class contains the main method with a method called
CreatWebhostBuilder(). It is responsible for running and configuring the application. The host for the application is set with the Startup type as a Startup class.
The Startup.cs class includes two important methods,
- ConfigureServices() - Used to create dependency injection containers and add services to configure those services.
- Configure () - Used to configure how the ASP.NET core application responds to an individual HTTP request.
Configure the Entity Framework Core
To interact with the database using EF Core, we should install some NuGet packages first.
Either install these packages from the package manager or using the package manager console. Package manager console can be opened from Tools -> NuGet Package Manager -> Package Manager Console.
Run these commands in the package manager Console.
- Install-Package Microsoft.EntityFrameworkCore -Version 3.1.10
- Install-Package Microsoft.EntityFrameworkCore.Tools -Version 3.1.10
- Install-Package Microsoft.EntityFrameworkCore.SqlServer -Version 3.1.10
Set up Models and DBContext classes
Create a folder called Models to hold the model classes. Let's create the Author and Book entity model classes.
Models/Author.cs
using System;
using System.Collections.Generic;
using System.ComponentModel.DataAnnotations;
using System.ComponentModel.DataAnnotations.Schema;
using System.Linq;
using System.Threading.Tasks;

namespace ASPApiDemo.Models
{
    [Table("Author")]
    public class Author
    {
        [Key]
        public Guid AuthorId { get; set; }

        [Required]
        [MaxLength(50)]
        public string FirstName { get; set; }

        [Required]
        [MaxLength(50)]
        public string LastName { get; set; }

        public ICollection<Book> Books { get; set; } = new List<Book>();
    }
}
Models/Book.cs
using System;
using System.Collections.Generic;
using System.ComponentModel.DataAnnotations;
using System.ComponentModel.DataAnnotations.Schema;
using System.Linq;
using System.Threading.Tasks;

namespace ASPApiDemo.Models
{
    public class Book
    {
        [Key, DatabaseGenerated(DatabaseGeneratedOption.Identity)]
        public Guid BookId { get; set; }

        [Required]
        [MaxLength(150)]
        public string Title { get; set; }

        [MaxLength(200)]
        public string Description { get; set; }

        [ForeignKey("AuthorId")]
        public Author Author { get; set; }
        public Guid AuthorId { get; set; }
    }
}
Creating a context file
Let's create a context file, add a new class file, and name it as LibraryContext.cs.
namespace ASPApiDemo.Entities
{
    public class LibraryContext:DbContext
    {
        public LibraryContext(DbContextOptions<LibraryContext>
options):base(options)
        {
            Database.Migrate();
        }
        public DbSet<Author> Authors { get; set; }
        public DbSet<Book> Books { get; set; }
    }
}
Finally, let’s register our context in the ConfigureServices method of Startup.cs.
using ASPApiDemo.Models;

// Code removed for brevity
public void ConfigureServices(IServiceCollection services)
{
	services.AddControllers();
	services.AddDbContext<AppDbContext>(options => options.UseSqlServer(Configuration.GetConnectionString("DefaultConnection")));
	services.AddScoped<AppDbContext>();
}

// Code removed for brevity
Generate Database using code-first approach
Run and follow command in the Package Manager console.
Add-Migration API_Demo.Entities.LibraryContext
This will create a class for migration.
Run the following command to update the database.
Update-database
Sending data
Let's add some data to the author table. For this, we need to override the method of OnModelCreating in the LibraryContact class.
namespace ASPApiDemo.Models
{
    public class LibraryContext:DbContext
    {
        public LibraryContext(DbContextOptions<LibraryContext>
options):base(options)
        {
            Database.Migrate();
        }
        public DbSet<Author> Authors { get; set; }
        public DbSet<Book> Books { get; set; }

        protected override void OnModelCreating(ModelBuilder modelBuilder)
        {
            modelBuilder.Entity<Author>().HasData(new Author
            {

                AuthorId= Guid.NewGuid(),
                FirstName = "nik",
                LastName = "rathod",
                Genre = "Drama"

            }, new Author
            {
                AuthorId=Guid.NewGuid(),
                FirstName = "vivek",
                LastName = "rathod",
                Genre = "Fantasy"
            });
        }
     }
}
Let's run the migration and update the command once again.
Add-Migration API_Demo.Entities.LibraryContextSeed
and
Update-database
Create the API Controllers
We can add the API Controller in two ways. You can either add the controller by manually writing the code or scaffold the controller.
In this tutorial, we'll write the Author controller manually and scaffold the Books controller.
Writing Author Controller
Right-click on the controller folder and go to Add-> Controller. Simply select the API template and give a name for the controller. We named the controller as AuthorsController.
AuthorsController.cs
using ASPApiDemo.Models;
using Microsoft.AspNetCore.Mvc;
using Microsoft.EntityFrameworkCore;
using System;
using System.Linq;

namespace ASPApiDemo.Controllers
{
    // Synchronous method
    [Route("api/[controller]")]
    [ApiController]
    public class AuthorController : ControllerBase
    {
        private AppDbContext _db;
        public AuthorController(AppDbContext db)
        {
            _db = db;
        }
    }
}
Here, we've created the controller and configured it to accept the database context through Dependency Injection.
Next, we should add the necessary actions to View, List, Create, Update and Delete the authors.
List all authors
To list all authors, add the following action method to the controller.
// List all authors
// api/authors
[HttpGet]
public IQueryable<Author> Get()
{
	return _db.Authors;
}
This method returns a list of Authors. It will be called when we visit /api/Authors using GET method.
View a single author
Add the following action method to view a single author when an id is passed.
[HttpGet("{id}")]
public ActionResult<Author> Get(Guid id)
{
	return _db.Authors.FirstOrDefault(m=>m.AuthorId == id);
}
This method needs id as the first parameter and it should be called in GET method.
Example: POST https://localhost:44344/api/authors/2b765b9e-2eed-4627-bb03-04c168730f25
Update Author
To update an author, we should pass the id as URL parameter and the updated data as the body.
[HttpPut("{id}")]
public ActionResult<Author> Put(Guid id, Author author)
{
    if (id != author.AuthorId)
    {
    	return BadRequest();
    }
    if (_db.Authors.Any(m=>m.AuthorId == id))
    {
        _db.Entry(author).State = EntityState.Modified;
        _db.SaveChanges();
        return Ok();
    }
    else
    {
        return NotFound();
    }
}
This should be called in PUT method.
Example: PUT https://localhost:44344/api/authors/2b765b9e-2eed-4627-bb03-04c168730f25 and pass content as body.
Create Author
To create an author, simply pass the FirstName and LastName of the author in POST method.
// Create a new author
// api/author
[HttpPost]
public ActionResult<Author> Post(Author author)
{
    if (ModelState.IsValid)
    {
        _db.Authors.Add(author);
        _db.SaveChanges();
        return CreatedAtAction(nameof(Get), new { id = author.AuthorId }, author);
    }
    return author;
}
Example: POST https://localhost:44344/api/authors/
Delete Author
The delete method should be called in DELETE method and the id of the author that we want to delete should be passed as the parameter. Delete method does not accept content body.
[HttpDelete("{id}")]
public ActionResult Delete(Guid id)
{
    var author = _db.Authors.Find(id);
    if (author == null)
    {
        _db.Authors.Remove(author);
        return Ok();
    }
    else
    {
        return NotFound();
    }
}
Example: DELETE https://localhost:44344/api/authors/2b765b9e-2eed-4627-bb03-04c168730f25
Complete code
Here is the complete code of Author controller.
using ASPApiDemo.Models;
using Microsoft.AspNetCore.Mvc;
using Microsoft.EntityFrameworkCore;
using System;
using System.Linq;

namespace ASPApiDemo.Controllers
{
    // Synchronous method
    [Route("api/[controller]")]
    [ApiController]
    public class AuthorsController : ControllerBase
    {
        private AppDbContext _db;
        public AuthorsController(AppDbContext db)
        {
            _db = db;
        }

        // List all authors
        // api/authors
        [HttpGet]
        public IQueryable<Author> Get()
        {
            return _db.Authors;
        }

        // View details of a single record
        // api/authors/<guid>
        [HttpGet("{id}")]
        public ActionResult<Author> Get(Guid id)
        {
            return _db.Authors.FirstOrDefault(m=>m.AuthorId == id);
        }

        // Create a new author
        // api/author
        [HttpPost]
        public ActionResult<Author> Post(Author author)
        {
            if (ModelState.IsValid)
            {
                _db.Authors.Add(author);
                _db.SaveChanges();
                return CreatedAtAction(nameof(Get), new { id = author.AuthorId }, author);
            }
            return author;
        }

        [HttpPut("{id}")]
        public ActionResult<Author> Put(Guid id, Author author)
        {
            if (id != author.AuthorId)
            {
                return BadRequest();
            }
            if (_db.Authors.Any(m=>m.AuthorId == id))
            {
                _db.Entry(author).State = EntityState.Modified;
                _db.SaveChanges();
                return Ok();
            }
            else
            {
                return NotFound();
            }
        }

        [HttpDelete("{id}")]
        public ActionResult Delete(Guid id)
        {
            var author = _db.Authors.Find(id);
            if (author == null)
            {
                _db.Authors.Remove(author);
                return Ok();
            }
            else
            {
                return NotFound();
            }
        }
    }
}
Scaffolding the Books controller
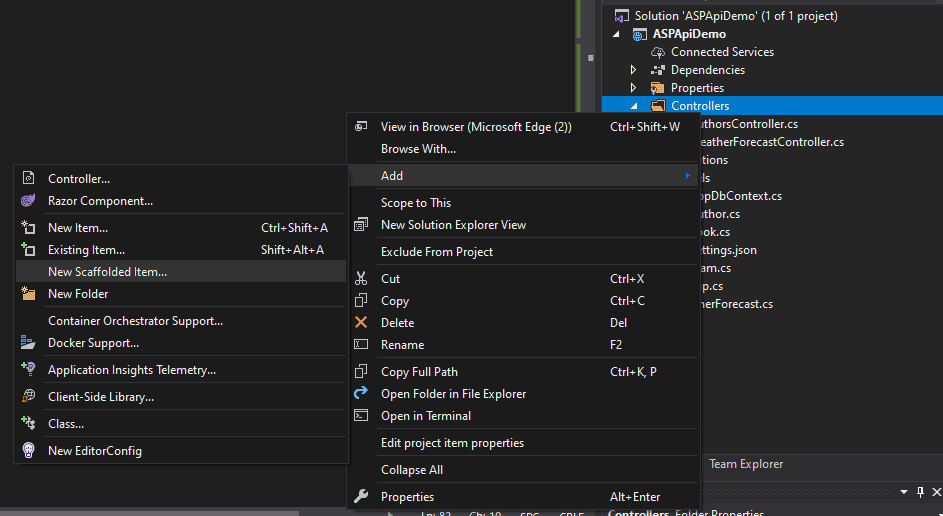
To scaffold a controller, right-click on the Controllers folder and select Add -> New Scaffolded Item.
Select API from the template and choose API Controller with actions using Entity Framework option.
In the next window, select Book model and the Database context class from the dropdown as shown in the picture and click Add button.
Visual Studio will now create the controller with Action methods to perform CRUD operation.
Testing the API
Now, we can test the API that we created just now using Postman. If you are new to postman, It is a tool that is used to test web APIs that is difficult to test using from a browser.
Test Author List API: GET Method
The author API can be accessed at https://localhost:44344/api/authors. This endpoint returns the list of authors in JSON format.
To test this API, run the project and open Postman. Click on the + icon and enter the API endpoint URL. Make sure that the request method is GET.
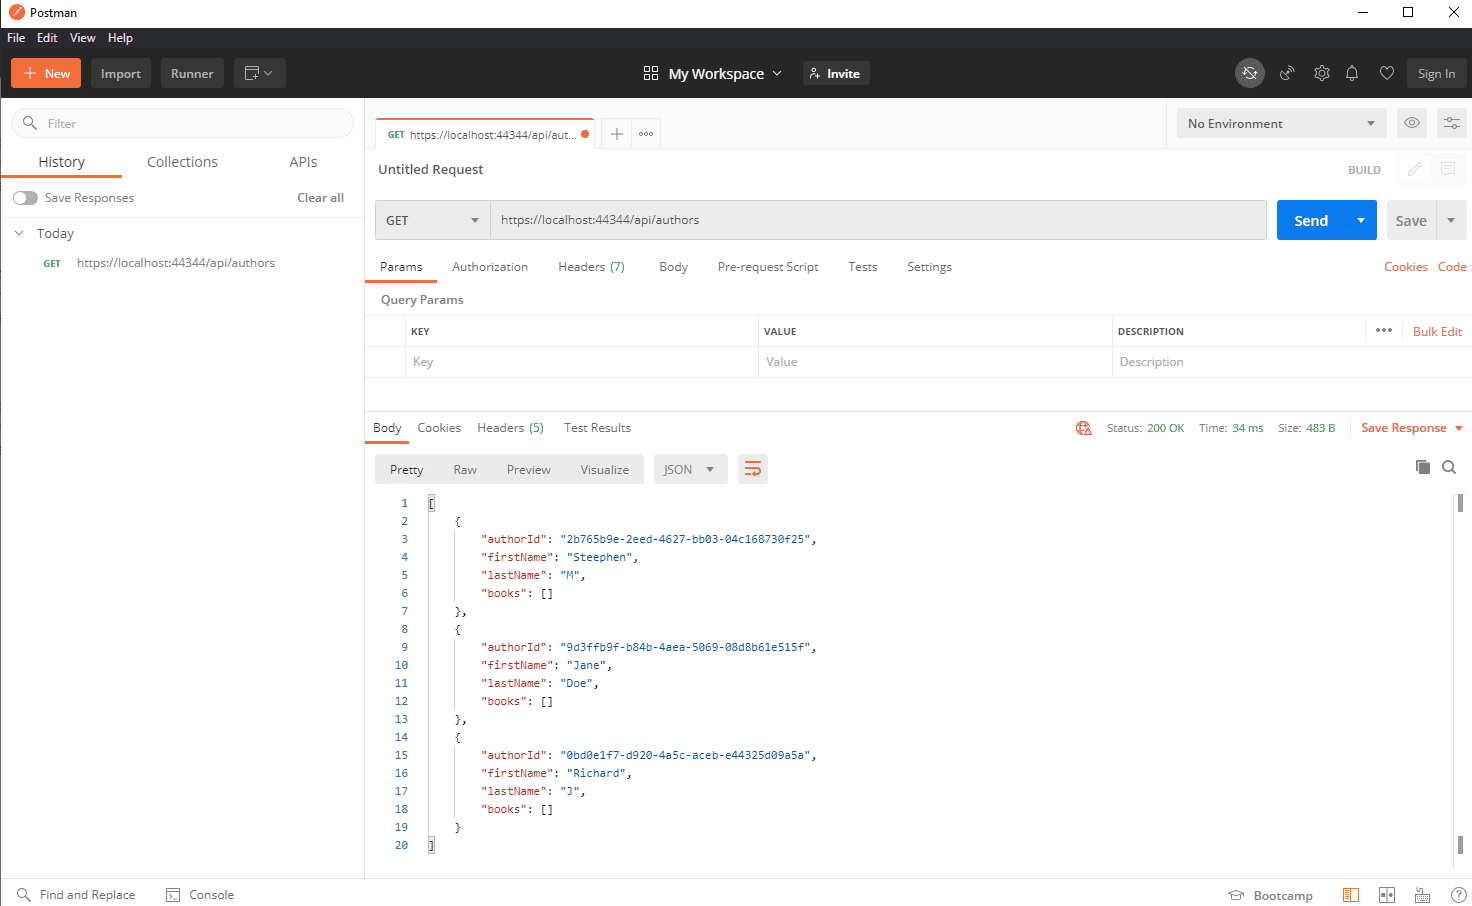
Replace the post number 44344 with your post number.
Test Author API - Create an author: POST Method
Let's create a new author. To create a new author, what we have to do is, send the First Name, and Last Name of the author to the same endpoint in POST method as JSON data.
In Postman, select POST as the request method. To send the details (First Name and Last Name) of the author as request body, click on the body section and change the content type to JSON. Then add the following as the content.
{
    "firstName": "William",
    "lastName": "Rey"
}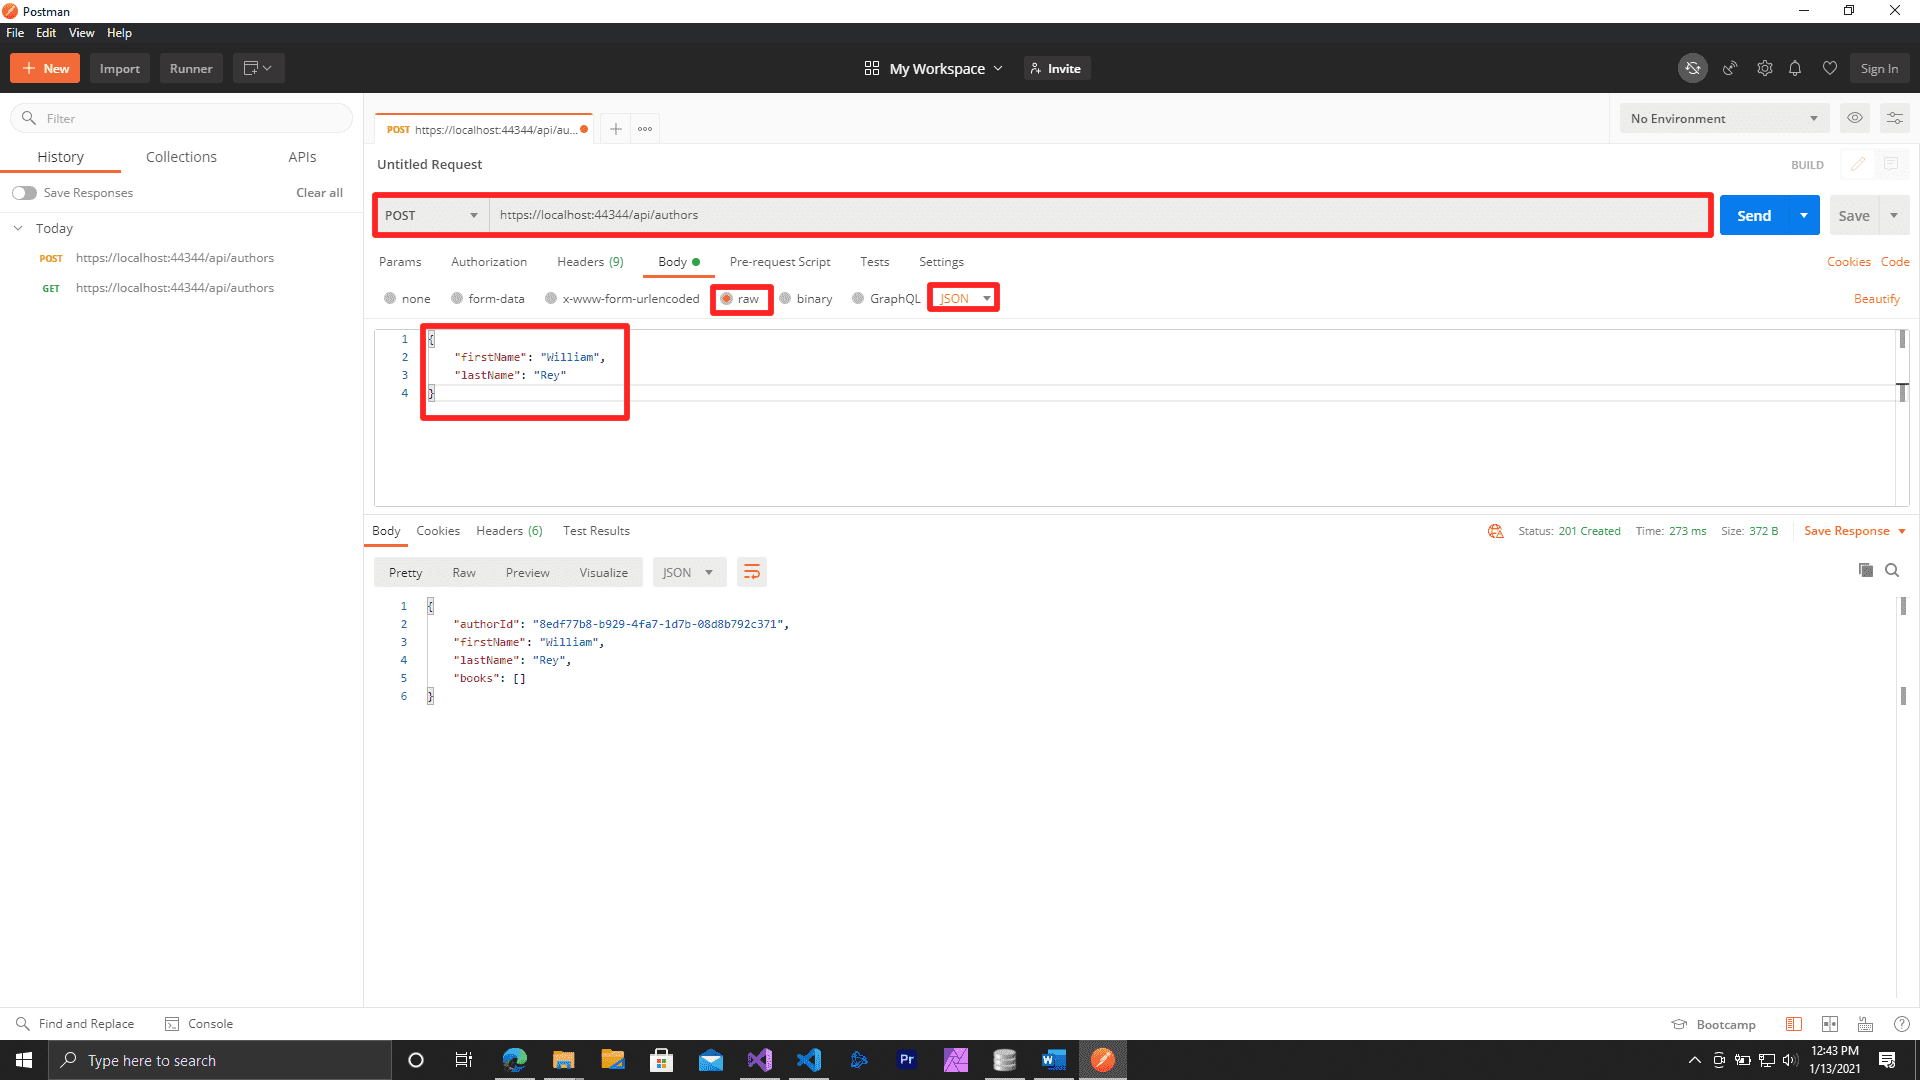
Sending the request will create a new author entry.
Test Author API - Update an author: PUT Method
To update an existing author, we should use the PUT method and pass the author Id as query parameter.
Here is an example:
https://localhost:44344/api/authors/8edf77b8-b929-4fa7-1d7b-08d8b792c371
Now, let us update the details of the author that we created just before.
Change the request method to PUT in postman and change the URL as shown above. You cave to change the GUID.
In the body section, add the following:
{
    "AuthorId": "8edf77b8-b929-4fa7-1d7b-08d8b792c371",
    "firstName": "William",
    "lastName": "R"
}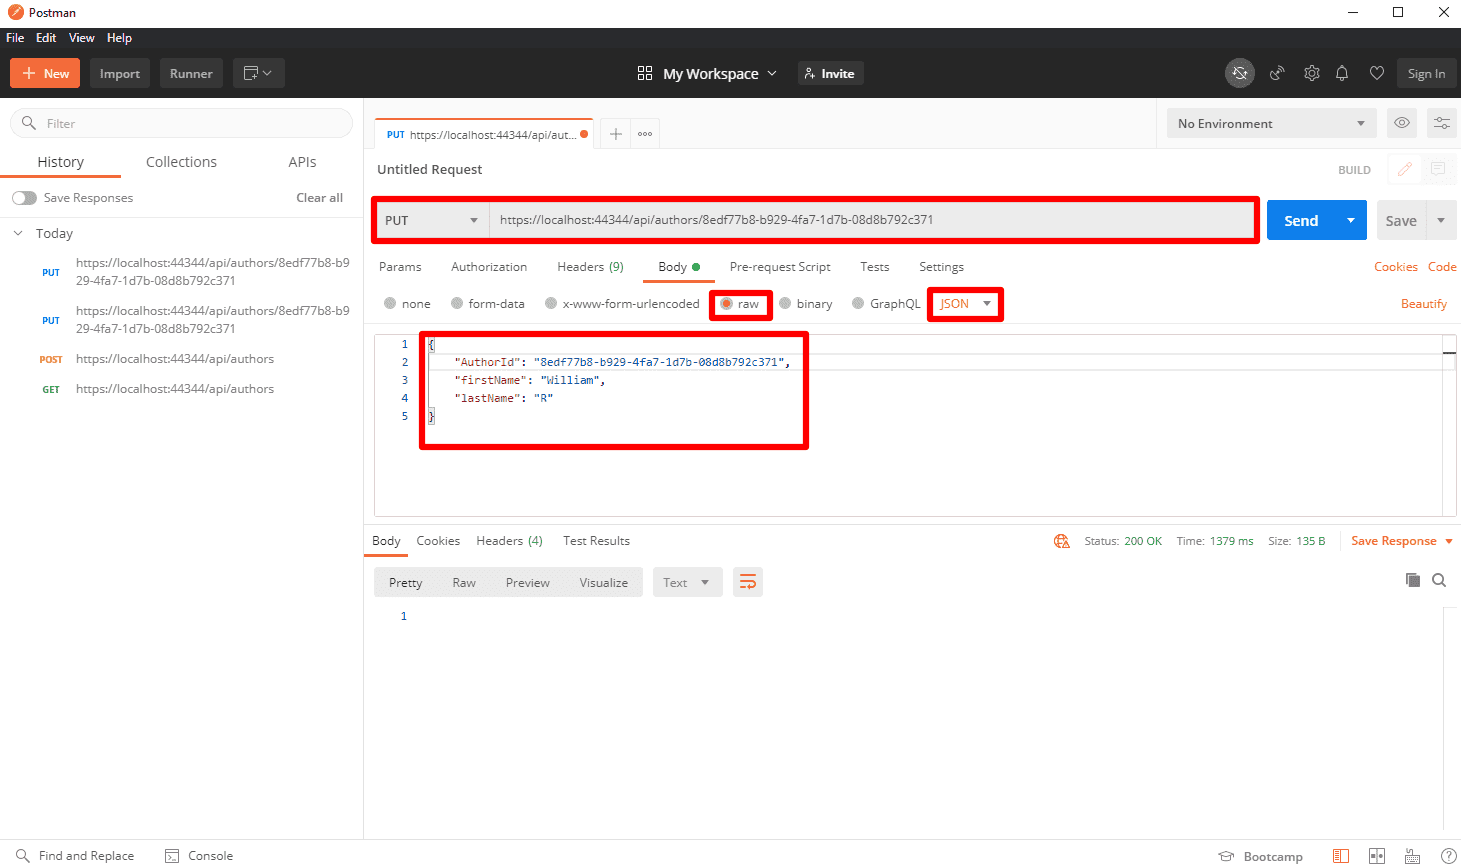
Send the request. Details of the author will be updated and status code 200 will be returned.
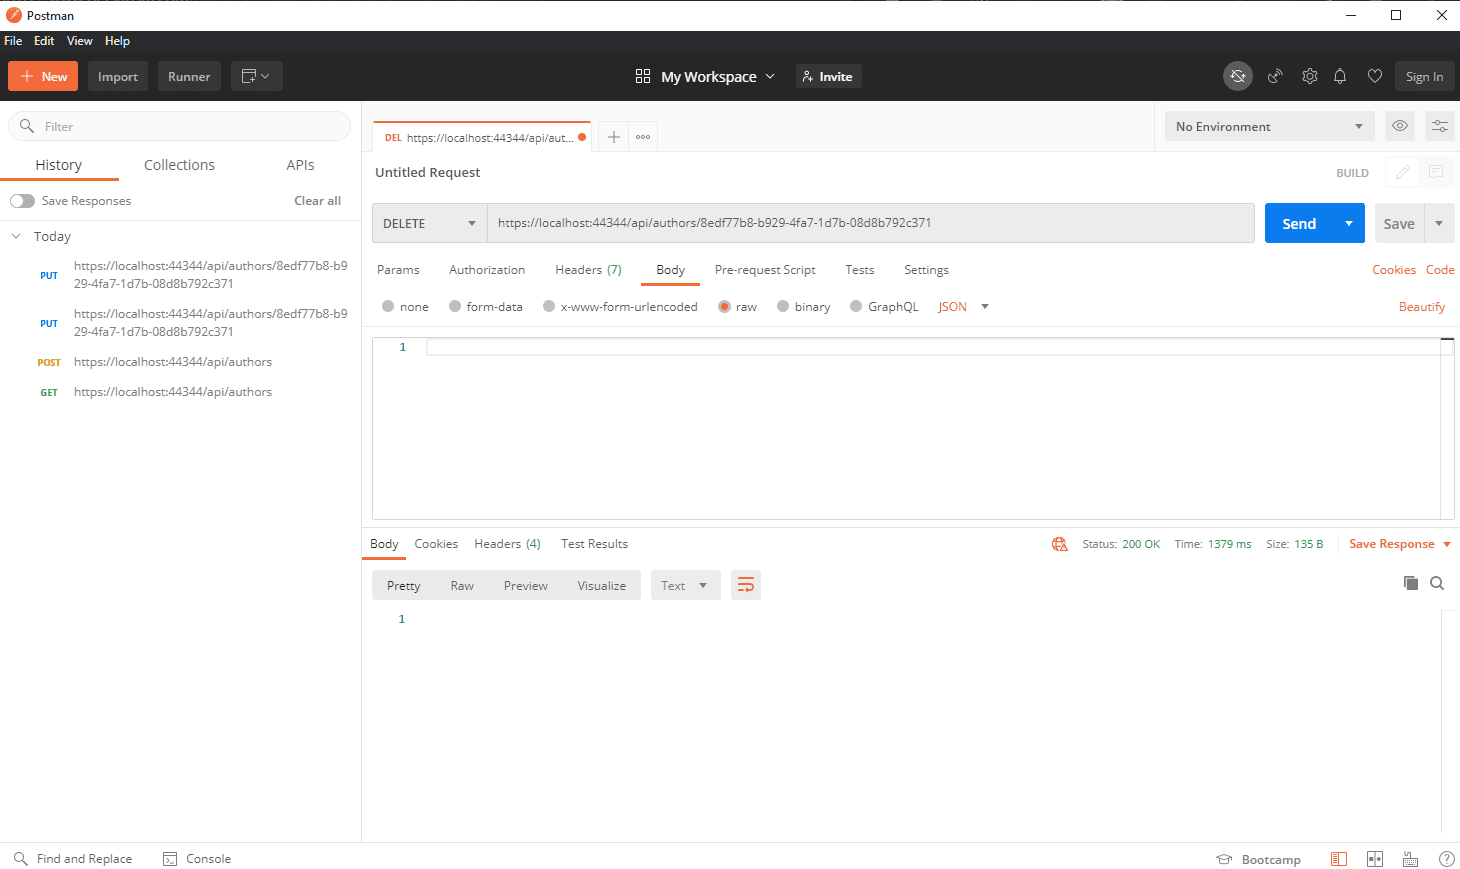
Test Author API - Delete an author: DELETE Method
To delete an author, simply pass the author id to the API endpoint in DELETE method.
DELETE https://localhost:44344/api/authors/8edf77b8-b929-4fa7-1d7b-08d8b792c371
We do not have to pass anything as the request body.
Conclusion
In this article, we have learned how to create a simple web API in ASP .NET Core. The approach is simple to learn and believe us once you get familiar with the process and how it works, you can literally play with the development.


