Introduction
Search is an inevitable feature that every blog should have. It will be easy to find posts from a blog that has only a few posts. But for large websites or blogs with thousands of posts, it will be difficult for users to find a post without a search option.
As of 13th August 2022, search functionality is now a part of the Ghost core. We can now implement search functionality without using any third-party libraries. For more information, please read this post.
Previous Posts
This tutorial is divided into a few sections. If you missed any previous posts, please read them first.
- Part 1 - Create a simple Ghost theme.
- Part 2 - Add navigation bar and custom templates.
- Part 3 - Add search to the theme.
- Part 4 - Integrating comments and partials.
Download source code
If you are facing any issues or errors, you can download the source code from GitHub and use it as a reference. Code downloaded from previous posts will we different.
Add search option to Ghost themes
In this post, I'll be using a free search library called ghost-search to add a search option to our theme. You can download the library from the link given below.
Setup search
Step 1: Create a custom integration
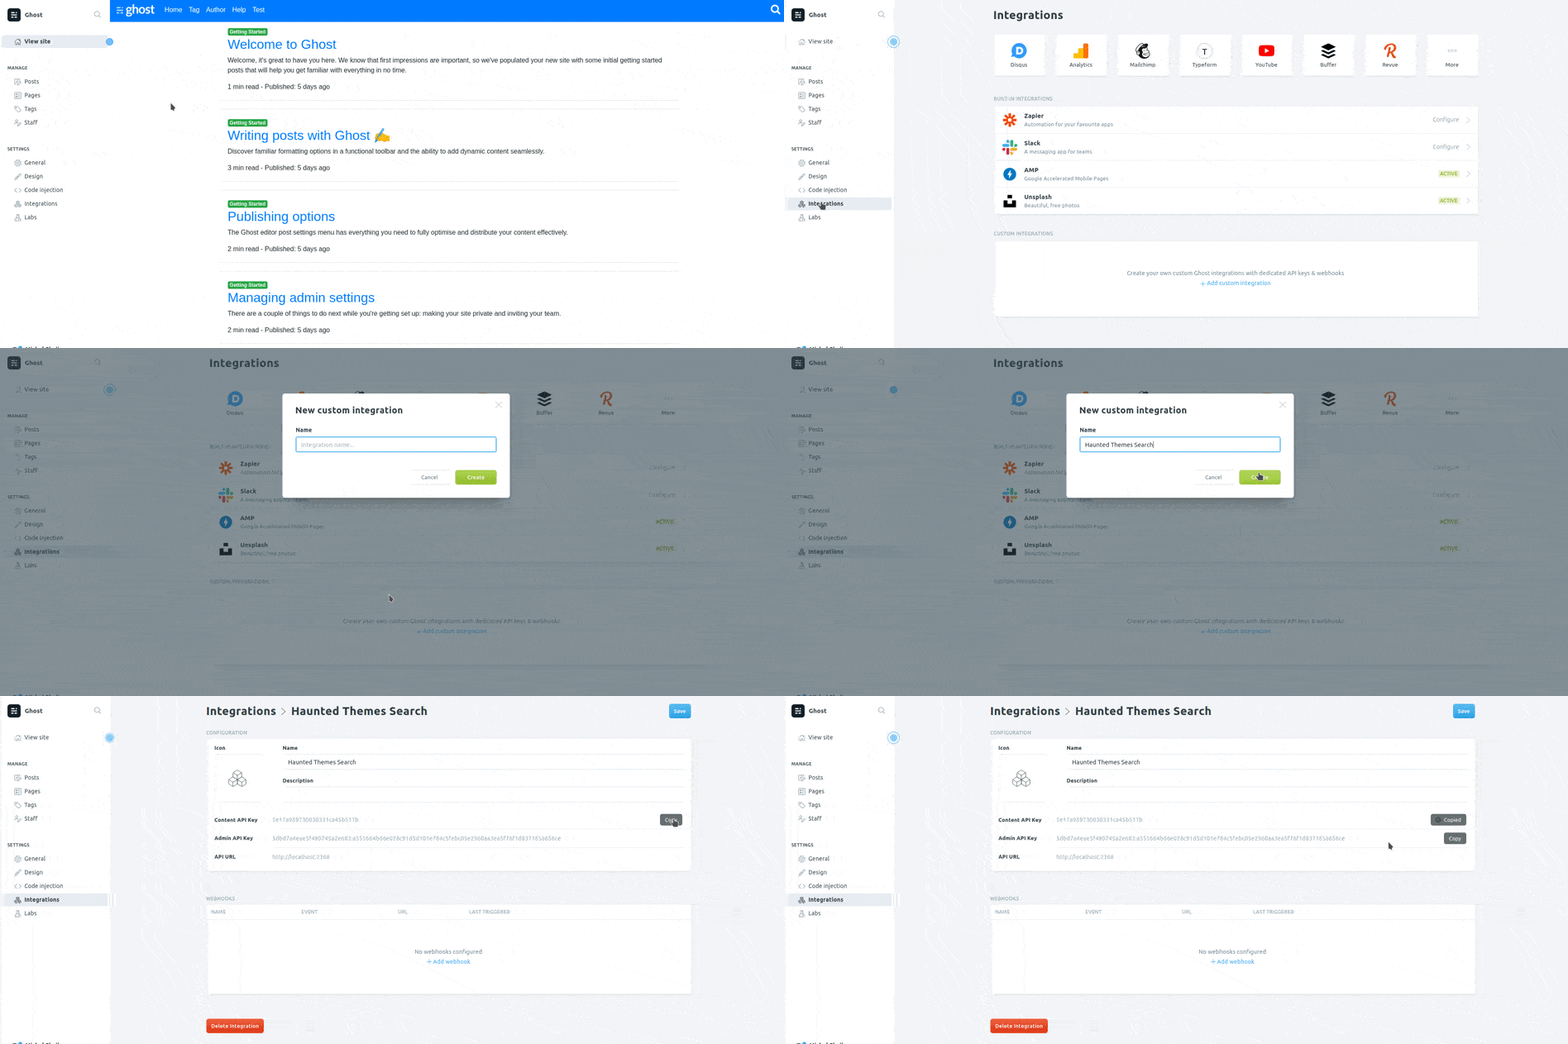
Login to the Ghost admin dashboard and go to Integrations -> Add custom integration. Name the integration as Haunted Themes Search and copy the Content API Key.

Step 2: Add Ghost content API
For the ghost search plugin to work, we should add the Ghost content API JavaScript library to the theme just above the {{ghost_footer}} in default.hbs.
<script src="https://unpkg.com/@tryghost/content-api@1.3.3/umd/content-api.min.js"></script>Step 3: Add search library
You can add the search library to the theme either by adding it to the themes folder or using CDN.
If you want to use CDN, just add the following link just above the {{ghost_footer}} in default.hbs.
<script src="https://cdn.jsdelivr.net/npm/ghost-search@1.0.1/dist/ghost-search.min.js"></script>
Using without CDN
To add the library to your theme or you don't want to use a CDN, download the files and save them as ghost-search.js and ghost-content-api-v1.js to assets/js.
I've added bootstrap.min.js, jquery.slim.js, popper.min.js (for bootstrap), ghost-content-api.min.js, and ghost-search.js (for ghost search) to the folder.
.
├── assets
│   ├── css
│   └── js
│       ├── bootstrap.min.js
│       ├── ghost-content-api-v1.js
│       ├── ghost-search.js
│       ├── jquery.slim.js
│       ├── main.js
│       └── popper.min.js
We can add references to these files from the theme files with the help of {{asset}} helper. This helper makes sure that the relative path to an asset is always correct, regardless of how Ghost is installed.
{{asset 'path-to-the-asset'}}
Open default.hbs and add the following line just above {{ghost_footer}}.
<script src="{{asset 'js/ghost-search.js'}}"></script>Here's my default.hbs file.
<!doctype html>
<html lang="{{@site.lang}}">
<head>
<title>{{meta_title}}</title>
<!-- Required meta tags -->
<meta charset="utf-8">
<meta name="viewport" content="width=device-width, initial-scale=1, shrink-to-fit=no">
<!-- Bootstrap CSS -->
<link rel="stylesheet" href="{{asset "css/bootstrap.min.css"}}">
{{!-- Custom Styles --}}
<link rel="stylesheet" href="{{asset "css/style.css"}}">
{{!-- Dynamic header content for SEO, meta tags, code injection etc --}}
{{ghost_head}}
</head>
<body class="{{body_class}}">
{{!-- Navigation bar --}}
{{"navigation"}}
{{!-- End Navbar --}}
{{!-- All the main content gets inserted here, index.hbs, post.hbs, etc --}}
{{{body}}}
{{> "search"}}
{{!-- Footer content goes here --}}
<div class="card">
<div class="card-footer text-muted">
© {{date format="YYYY"}} {{@site.title}}
</div>
</div>
{{!-- End of footer --}}
{{!-- Content API --}}
{{!-- <script src="https://unpkg.com/@tryghost/content-api@1.3.3/umd/content-api.min.js"></script> --}}
{{!-- Search API --}}
{{!-- <script src="https://cdn.jsdelivr.net/npm/ghost-search@1.0.1/dist/ghost-search.min.js"></script> --}}
<!-- Optional JavaScript -->
<!-- jQuery Slim first, then Popper.js, then Bootstrap JS -->
<script src="{{asset "js/jquery.min.js"}}"></script>
<script src="{{asset "js/popper.min.js"}}"></script>
<script src="{{asset "js/bootstrap.min.js"}}"></script>
{{!-- Scripts for search --}}
<script src="{{asset 'js/ghost-content-api-v1.js'}}"></script>
<script src="{{asset 'js/ghost-search.js'}}"></script>
{{!-- Dynamic footer content from code injection etc --}}
{{ghost_foot}}
</body>
</html>{{> "search"}} tag just below the {{{body}}} helper as shown here. We'll soon create this file (search.hbs) under the partials folder and will be used to display search results. Step 4: Add a search box
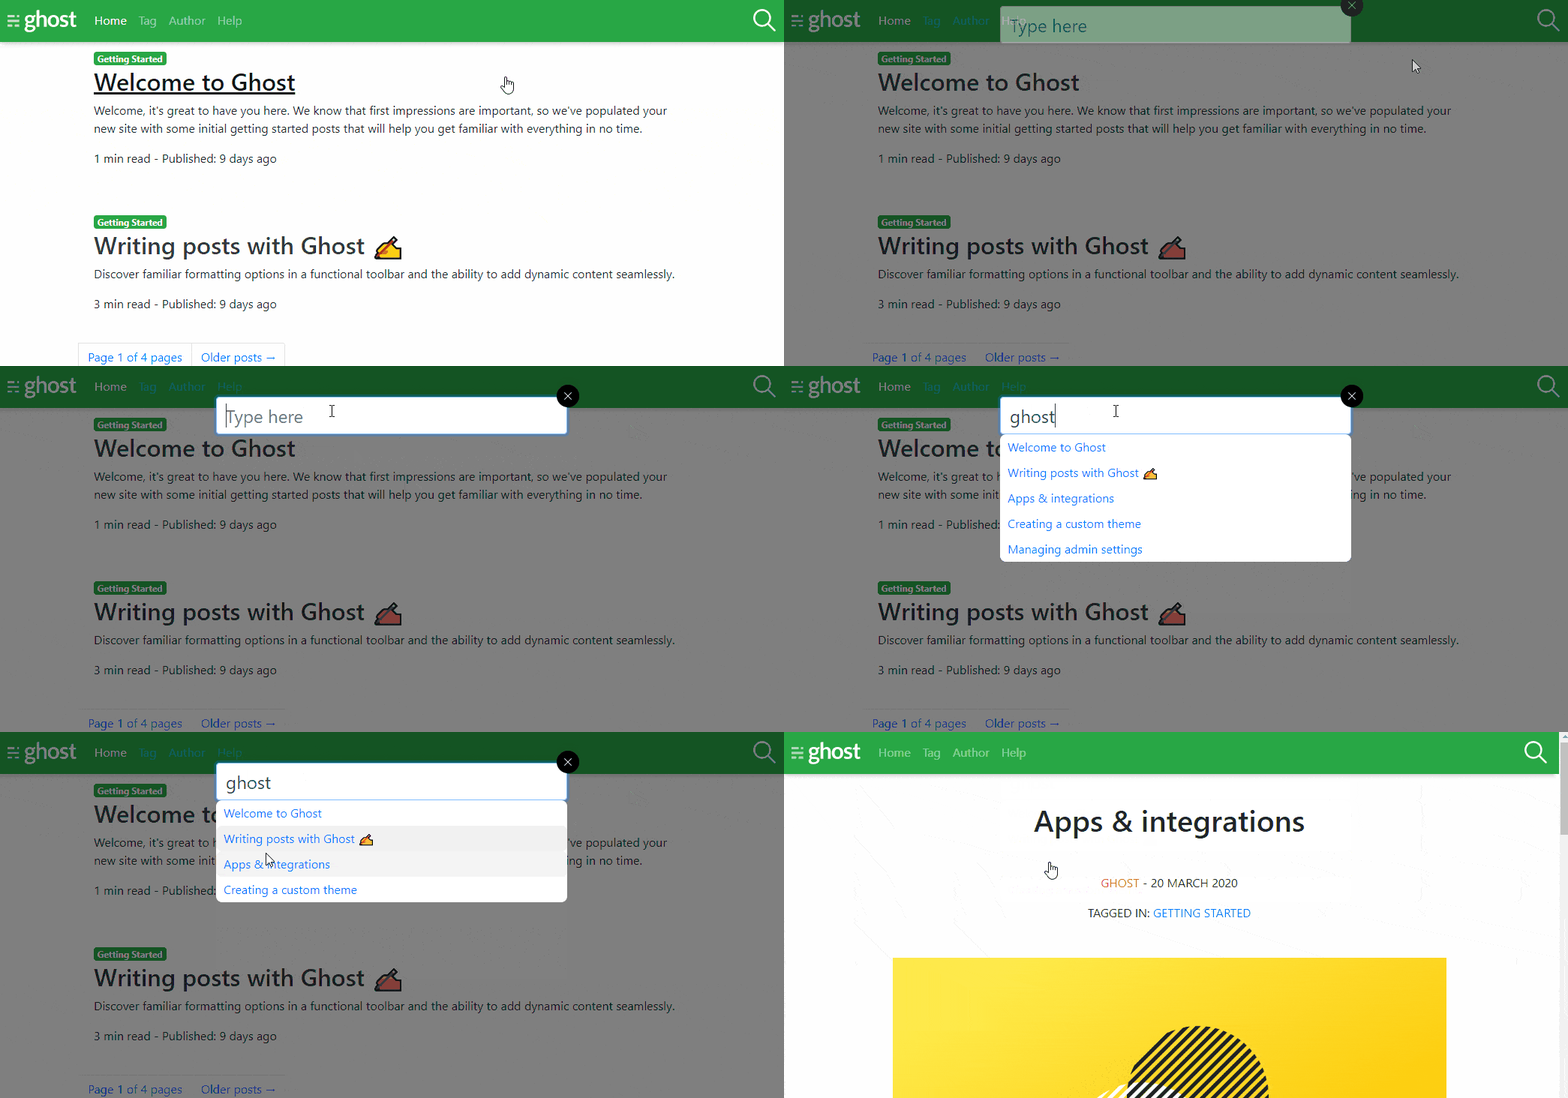
To add a search box, open partials/navigation.hbs and modify it as shown below to add a search icon to the navigation bar.
<nav class="navbar navbar-expand-lg navbar-dark bg-success fixed-top"
    style="box-shadow: 0 8px 6px -6px rgb(197, 197, 197);">

    {{!-- Site icon --}}
    <a class="navbar-brand" href="{{@site.url}}">
        <img src="{{@site.logo}}" alt="{{@site.title}}" class="site-logo">
    </a>

    {{!-- Toogler --}}
    <button class="navbar-toggler" type="button" data-toggle="collapse" data-target="#navbarToggler"
        aria-expanded="false">
        <span class="navbar-toggler-icon"></span>
    </button>


    {{!-- Links --}}
    <div class="collapse navbar-collapse" id="navbarToggler">
        <ul class="navbar-nav mr-auto mt-2 mt-lg-0">
            {{#foreach navigation}}
            <li class="nav-item {{#if current}}active{{/if}}">
                <a class="nav-link" href="{{url absolute="true"}}">{{label}}</a>
            </li>
            {{/foreach}}
        </ul>

        {{!-- Search Icon --}}
        <div class="my-2 my-lg-0">
            <img src="{{asset "icons/search.svg"}}" height="30" data-toggle="modal" data-target="#searchModel">
        </div>

    </div>

</nav>
Step 5: Display search results
To display search results, create a new file name search.hbs under the partials folder and add the following code to it.
<div class="modal fade" id="searchModel" tabindex="-1" role="dialog" aria-hidden="true">
    <div class="modal-dialog" role="document">
        <div class="modal-content search-content">
            <div class="modal-body">

                {{!-- Search box --}}
                <input id="ghost-search-field" class="form-control" placeholder="Type here">

                {{!-- Area to display search result --}}
                <ul id="ghost-search-results"></ul>

                {{!-- Close Button --}}
                <button type="button" class="btn btn-secondary" data-dismiss="modal" id="searchCloseButton"></button>
            </div>
        </div>
    </div>
</div>
It's just a bootstrap modal that will be displayed when the search icon is clicked.
Let's customize the bootstrap modal by adding these styles to style.css.
#ghost-search-results {
    list-style-type: none;
    padding-left: 0;
    background-color: #ffffff;
    border-radius: 8px;
}

#ghost-search-field {
    font-size: 1.5rem !important;
}

#ghost-search-results>li {
    padding: 5px 10px;
    transition-duration: .5s;
    border-radius: 8px;
}

#ghost-search-results a {
    text-decoration: none;
}

#ghost-search-results>li:hover {
    background-color: #e2e2e2;
}

.search-content {
    background-color: transparent !important;
    border: none !important;
    padding: 0 !important;

}

#searchCloseButton {
    position: absolute;
    width: 30px;
    height: 30px;
    border-radius: 50%;
    right: 0px;
    top: 0px;
    background-size: 20px;
    background-image: url("../icons/close.svg");
    background-position: center;
    background-color: #000000;
    border: 1px solid #000000;
}
The ghost-search library will, by default, show search results in the HTML element with id ghost-search-results.Step 6: Initialize the library
We need to initialize ghost-search library to make the search functional. It involves two steps.
Initializing the library
Create a new file named script.js under assets/js and add this code. This is where we'll write all the custom JavaScript code for our theme.
if (typeof geekContentAPIKey !== 'undefined' && typeof geekSearchURL !== 'undefined') {
    var ghostSearch = new GhostSearch({
        key: geekContentAPIKey,
        host: geekSearchURL,
        template:function(result) {
            let url = [location.protocol, '//', location.host].join('');
            return '<li><a href="' + url + '/' + result.slug + '">' + result.title + '</a></li>';
        }
    });
}
Next, add a reference to this file in default.hbs just below{{ghost_foot}} helper as shown here.
{{!-- Custom script for the theme --}}
<script src="{{asset 'js/script.js'}}"></script>
Passing API key and URL
Add the following code to the site footer from Ghost admin dashboard -> Code Injection -> Site footer.
<script type="text/javascript">
    var geekContentAPIKey='place_the_content_api_key_generated_in_step_1_here';
    var geekSearchURL = 'Replace with api url obtained in step 1';
</script>
We can also hard-code this in the theme. But, will not work with a different Ghost installation.
By default, ghost-search will show the first 10 results based on the post title. Here's another example that displays search results based on post title and content.
if (typeof geekContentAPIKey !== 'undefined' && typeof geekSearchURL !== 'undefined') {
    var ghostSearch = new GhostSearch({
        key: geekContentAPIKey,
        host: geekSearchURL,
        template:function(result) {
            let url = [location.protocol, '//', location.host].join('');
            return '<li><a href="' + url + '/' + result.slug + '">' + result.title + '</a></li>';
        },
        options: {
            keys: [
                'title',
                'plaintext'
            ],
            limit: 15,
            allowTypo: false
        },
        api: {
            resource: 'posts',
            parameters: {
                fields: ['title', 'slug', 'plaintext'],
                formats: 'plaintext',
            },
        },
    });
}
Wrapping up
In this post, we learned to add a search option to the theme. As Ghost core does not have a search API, we have to use some third-party libraries to implement a search option.
Update: Ghost will have a search API soon.
Update 13th August 2022: Ghost now has native search. It is recommended to use the new search option.
Happy coding. 👍


